CiviCRM is a full-featured Customer Relationship Management system that can save business owners time when interacting with customers.
It is open-source and you can host it yourself in the administration area of your existing website. This means you have full control, you can adjust it to your own requirements and there are no monthly fees or advertisements to worry about.
CiviCRM was originally made for US non-profit organisations running Drupal so it needs to be adapted somewhat to work for a business website in another country running WordPress, and that's what this tutorial is about. Specifically, I'll show you how to do the following:
- Install CiviCRM on a WordPress site and keep it updated and secure
- Configure UK address, currency, date and paper formats
- Configure business terminology such as "payments" instead of "contributions"
- Add contacts, record future and past activities and generate reminders so you don't forget things
- Generate professional-looking invoices, credit notes, reminders and receipts
- Accept online payments and bookings as cheaply as possible
- Export records in a format that your accountant will appreciate
- Make mailing lists and newsletters that target specific customers and don't get blocked as spam
This tutorial is aimed at users and administrators and has been tested with CiviCRM 5.4 and WordPress 4.8 running on Ubuntu 16.04. It extends the official user and administrator guide with practical examples, testing procedures and tips.
Installation on WordPress
CiviCRM installation and upgrading is a bit more complex than the usual "one-click" WordPress plugin installation, but still fairly easy:
- Check that you are running a supported version of WordPress, MySQL and PHP and that you have a working backup.
- Get the latest WordPress version of CiviCRM (not the less secure LTS version) from https://civicrm.org/download, then unzip it to the 'wp-content/plugins' directory on your web server. You can do this using a control panel file manager or using a utility like WinSCP on Windows or Transmit on Mac OSX. Make sure the files have the same owner and permissions as the rest of your files.
- Get the "localisation" files from the same place and extract them one directory lower to 'wp-content/plugins/civicrm'. If you're comfortable using a command line, these commands will achieve the download and extraction, replacing '5.4.x' with the latest version number:
cd <your_wordpress_directory>/wp-content/plugins
wget https://sourceforge.net/projects/civicrm/files/civicrm-stable/5.4.x/civicrm-5.4.x-wordpress.zip
unzip civicrm-5.4.x-wordpress.zip
cd civicrm
wget https://sourceforge.net/projects/civicrm/files/civicrm-stable/5.4.x/civicrm-5.4.x-l10n.tar.gz
tar -xf civicrm-5.4.x-l10n.tar.gz
- In your WordPress dashboard, go to 'Plugins' and activate the CiviCRM plugin, then click the new menu item "CiviCRM Installer" that should appear at the top left.

- Change the "Language of basic data" to "English (United Kingdom)", fill in your database details (which can be the same as the WordPress database or different), check that all the requirements are green and click "Check Requirements and install CiviCRM". If installation is successful, it's normal at this stage to see "System Status: Error" warnings at the top right of the dashboard. Don't worry, we'll fix them.

- To solve the "Cron Not Running" error, I suggest following the instructions for the "wp-cli method" if possible because this keeps your password hidden. You will need to install the "wp-cli" command line interface utility if it's not already available, by executing the commands listed at wp-cli.org. Then use your hosting control panel to create a scheduled "cron" job to run a command like this about every 15 minutes (fill in your actual paths and username):
/path/to/wp-cli --user=<wordpress_administrator> --url=https://<your_wordpress_home> --path=</path/to/wp> civicrm api job.execute auth=0 > /dev/null
- To solve the "Configure Default Mailbox" error, use the control panel at your email host to create a special email address just to handle bounces (e.g. bounces@yourdomain.com), and configure the CiviCRM settings to access it under CiviCRM > Administer > CiviMail > Mail Accounts. This address is normally invisible to users so the name is not important. You can test it by going to Administer > System Settings > Scheduled Jobs > Fetch Bounces > more > Execute Now and then click the View Job Log button to check the result.
- To solve the "Complete Setup" error, follow the configuration procedure below, in particular the "Organization Address and Contact Info" step.


Updating
Check the "System Status" message in the footer of every CiviCRM administration screen to see if action is needed. If it's green, nothing urgent is necessary.

If it's a yellow "Warning" or red "Error" message you need to take quick action to keep your installation secure and reliable. CiviCRM updates sometimes have bugs, so make sure you have a backup of database contents and your user files in 'wp-content/uploads/civicrm' in case you need to roll back.
- Log in to the WordPress /wp-admin page as an administrator and stay logged in during the update process. Leave the CiviCRM plugin activated. You may wish to use a plugin such as "WP Maintenance Mode" to take the site offline temporarily.
- Use a file manager or a command line to delete the 'wp-content/plugins/civicrm' directory (don't just rename it, it must be moved out of /plugins). Then go to 'wp-content/uploads/civicrm' and delete the 'templates_c' directory, but leave all other files here intact, especially civicrm.settings.php.
- Get the latest version of CiviCRM and extract it to 'wp-content/plugins' and get the localisation files and extract them one directory lower in 'wp-content/plugins/civicrm', as for a new installation.
- Update the database contents by visiting the following address using a web browser (change <your_wordpress_home> to the home page of your WordPress site):
https://<your_wordpress_home>/wp-admin/admin.php?page=CiviCRM&q=civicrm/upgrade&reset=1

Tip: A free SSL certificate from LetsEncrypt that automatically renews is a good way to get 'https' connections working to protect user logins and payment details.
Tip: If you encounter a blank screen or other problems after installing or updating, make a backup then delete all old files in your /wp-content/plugins/civicrm and wp-content/uploads/civicrm directories and drop old database tables with the prefix "civicrm_" left over from previous installation attempts. Also try disabling all other WordPress plugins temporarily.
Tip: CiviCRM saves error logs in directory "wp-content/uploads/civicrm/ConfigAndLog".
WordPress saves errors in /wp-content/debug.log if you add the following lines to your wp-config.php file.
define( 'WP_DEBUG', true );
define( 'WP_DEBUG_LOG', true );
Configuration
After installation, the next step is configuring address and date formats, getting emails working and optionally setting up a card payment processor. There's a useful checklist at CiviCRM > Administer > Administration Console > Configuration Checklist. The exact settings will depend on your requirements, but I have some suggestions for UK business users in particular.
Localization
In the UK you will want to set "United Kingdom" as the language and country and "GBP" as the default and available currency. Other settings can be left unchanged.
To change date formats to international format, go to Adminster > Localization > Date Formats and change Complete Date and Time to "%E %B %Y, %k:%M", Complete Date to "%E %B %Y", Time Only to "%H:%M" and other date formats to "%Y-%m-%d". The Internationalisation Administrator's Guide has more information.
To change the PDF page format for invoices to A4, go to Administer > Communications > Print page (PDF) formats > Add PDF Page Format. Change the Paper Size setting to "ISO A4", the Unit of Measure to "Centimeters", set all margins to 2 cm, give it a name, make it the default and click "Save".
Organization Address and Contact Info
The "Default Domain Name" is just your company or trading name, not the website domain. If you're a limited company in the UK, your registered address should be shown on company correspondence including emails and it should be a physical address, not a PO box.
Enable components
For businesses, the most important components are CiviContribute and CiviMail. For now, I suggest disabling the others.
Address Settings
If the default country is set to the UK, somewhat confusingly the "State/Province" field is renamed "County" and the "County" field is unused. By default, the county is shown as a three letter abbreviation (e.g. "SRY" for Surrey) which is not customary in the UK so to avoid this, replace "contact.state_province" in the Mailing Labels and Address Display fields with "contact.state_province_name", or remove it entirely. You may wish to remove "contact.country" as well if all your customers are local.
You can disable irrelevant addressing options at Administer > System Settings > Option Groups > Addressing Options, for example to disable the Post Code Suffix and the Street Address Parsing. However, some values including the County are used programatically so take care (make sure you have a backup) before changing these.
It's possible to look up postcodes automatically by downloading an extension from Administer > System Settings > Extensions > Add New > CiviCRM Postcode Lookup but note that it costs at least £50/year to access the address file if you're not a charity.
Mapping and Geocoding
You can simply set the Mapping Provider to "Google" and leave other settings blank (although it's easy to get an API key for unlimited access, following the Google API instructions.) To test it, just create a new contact with a valid address, save it and then check whether a latitude and longitude and a "Map" link have been added.
![]()
Misc
You may wish to disable the "empowered by CiviCRM" display. If you will be using user registration forms you will probably need a pair of reCAPTCHA keys to prevent spam registrations, which you can get from Google.
Contact Types
Avoid creating new contact types yet - the built-in ones are good and you will probably want to use "Groups" to distinguish contact types such as customers.
Outbound Email
The default setting "mail()" is usually OK but you should test it using the button provided. If you're on shared hosting you may find that outgoing mail gets blocked by spam filters, in which case you will need to select the "SMTP" option and use an external provider. The cheapest and most reliable option I know is Amazon SES. It's also important that the domain you send emails from (the bit to the right of the '@' symbol) has been correctly set up with SPF and DKIM records.
From Email Addresses
The address you set here is an "admin" address that logged-in staff can use if they don't want to send messages from their personal address.
Payment Processors
It's good to set up at least one card Payment Processor because it removes the need to involve an administrator in every payment and it allows users to pay at any time of day.
You can avoid credit card fees (typically 3.4% +20p per transaction) by encouraging users to pay by direct bank transfer as explained below.
Stripe is simple for users (it doesn't obviously redirect to an external site like PayPal) and can be installed as an extension at Administer > System Settings > Extensions > Add New > Stripe > download. Call it something like "Credit/debit card". The secret and publishable keys you need can be found in the "API" section of the Stripe dashboard - there's a switch at the bottom of the sidebar to "View Test Data" and you will also need to add a "webhook" like this in the API Webhooks tab:
https://<your_wordpress_home>/?page=CiviCRM&q=civicrm/stripe/webhook
Stripe only accepts Visa, Mastercard and Amex so you will need to disable Discover at Administer > CiviContribute > Accepted Credit Cards.
To make a test payment create a "Contribution Page" at Contributions > New Contribution Page. Give it a title, pick a Financial Type such as "Member Dues" and click "Continue". Then select your Payment Processor and lower down check the Allow Other Amounts box, set the minimum amount to £0.30 and click "Save". Then click the "Contribution Links" button and select "Online Contribution (Test-drive)". Use an official test credit card number such as
4242 4242 4242 4242
(from the Stripe list of test numbers) with any CRV number and any expiry date in the future.
System Workflow Templates
The most important template for our purposes is the Contributions - Invoice. I'll discuss modifying and testing this template in detail below under "Setting up Invoices".
Tags (Categories)
Tags and Categories don't work in the current CiviCRM release and are less useful than Groups, so ignore this section.
Manage Groups
Groups are a very important feature of CiviCRM and are used for controlling access and for generating mailing lists. You will see an "Administrators" group has been automatically created for controlling admin access. For now I suggest creating a group called "Customers" that can be used as a mailing list or to give privileged access to your site. You should get into the habit of adding all new contacts to an appropriate group.
Custom Fields
Custom fields are useful for surveys or to collect extra information on registration forms. You can add these later. Fields are grouped into "fieldsets" so you create those first, then add the individual fields.
Profiles
Profiles are used to display or gather information from users using forms on the public "front end" of your website. They use the fields created above. They can be added later.
The remaining configuration links for "components" just go to documentation pages so let's move on and enable the important stuff.
Tip: If your outgoing emails are often lost in spam filters, use an external service such as Amazon SES with the correct SPF and DKIM records to deliver messages reliably and cheaply.
Setting up Invoices
To enable invoicing, first go to Administer > CiviContribute > CiviContribute Component Settings and check the "Enable Tax and Invoicing" box.
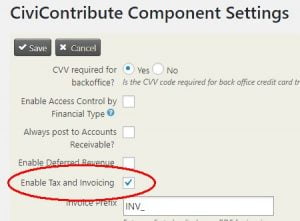
For the UK, you will want to change the Tax Term on this page to "VAT". If you're not VAT registered, you may wish to change the Tax Display Settings to "Do not show breakdown".
Next, we will generate a test payment. Go to Contacts > New Individual and create a contact with your real email address, if one doesn't exist already. Then go to Contributions > New Contribution, select that test contact, select any financial type, enter an amount (at least £0.30) and change the Contribution Status to 'Pending'.
Now let's look at the invoice that this test payment would generate. Go to Contributions > Dashboard and click the "View" button next to the test payment we just created (probably the top one). Click the "Print Invoice" button at the bottom right to download the invoice in PDF format.
You should see a quite nicely formatted page showing the amount due, with a detachable "PAYMENT ADVICE" section at the bottom.
The templates contain complex smarty template logic and need to work with lots of different email clients, so be cautious about making changes. One way to edit the HTML templates is to cut and paste the code into a text editor such as Notepad++, then save the file with extension '.html' and view it with a normal web browser to get an idea of the layout. To test the messages you will need to make some test transactions as described below.
Then go to Administer > CiviContribute > Financial Types and create a new financial type for your goods and services (e.g. "Service Fee").
You will probably want to replace the CiviCRM logo in messages such as the "Contributions - Invoice" message with your own. Make a small logo that works on a white background, upload it using the WordPress "Media" link in the dashboard, make a note of the location, height and width and replace the path and dimensions in line 10 of that template.